

Most clothing store owners find out about shrinkage problems months too late. By then, you're staring at an $8,000 inventory discrepancy during year-end count, trying to figure out where it all went. Shrinkage doesn't happen in one dramatic moment—it builds through dozens of small operational cracks that quietly compound over time.
Having helped set up inventory tracking systems for boutiques and small chains, the stores that catch shrinkage early all share one habit: they run quick, focused audits on specific problem areas every month. Not comprehensive inventory counts that shut down the store. Not complex loss prevention programs that require dedicated staff. Just targeted 30-minute checks on the three areas where shrinkage actually starts.
The receiving dock blind spot that costs you 2% annually
Your receiving process probably looks fine on the surface. Staff counts boxes, checks packing slips, enters quantities into your system. But roughly 4 out of every 100 items that arrive never make it to your sales floor correctly.
Sometimes the vendor ships 11 pieces instead of 12 in a mixed denim shipment. Sometimes a team member types 24 instead of 42 in a rush. Sometimes a box of accessories sits unopened in the stockroom corner for three weeks because everyone assumed someone else processed it.
The receiving audit takes about 20 minutes once you know what to look for. Pull your last 10 receiving records from the past month—highest-value shipments first. For each one, physically spot-check three items from that shipment on your floor or in storage. Not every item, just three random SKUs.
Match what you see against three data points: the original purchase order quantity, the packing slip quantity, and what got entered into your POS. When these don't align, you've found a shrinkage source.
Here's the investigation sequence that works:
-
SKU number
-
Expected quantity (from PO)
-
Received quantity (from packing slip)
-
System quantity (from POS)
-
Actual quantity (physical count)
Step 2: Trace the breakdown point
-
If PO doesn't match packing slip → vendor shortage
-
If packing slip doesn't match system → receiving error
-
If system doesn't match physical → post-receiving loss
Step 3: Check for patterns
Track these variances in a simple spreadsheet. After three months, patterns start showing up. Maybe Tuesday shipments always have problems because that's when your newest employee works alone. Maybe items from one specific vendor consistently arrive short.
The corrective action depends on where the breakdown happens. For vendor shortages, create a standard shortage claim template and file it immediately—most vendors have 48-hour claim windows. For receiving errors, require two-person verification on any shipment over $500. For post-receiving losses, that's usually a storage organization issue that needs its own fix.
Fitting room shrinkage moves faster than you think
Fitting rooms create a shrinkage problem that's unique to clothing stores. Unlike grocery stores where theft happens at exits, or electronics stores where high-value items stay locked up, your fitting rooms give customers unsupervised time with multiple items behind a closed door.
Take control of your clothing store operations.
Werzly helps you manage stock, process orders, and engage customers effortlessly.
- Unified inventory and order management
- Automated customer notifications
- Sales and stock analytics
No credit card required
The monthly fitting room audit reveals patterns before they become major losses. This check takes about 25 minutes and should happen on different days each month—experienced shoplifters watch for routines too.
Start by pulling your fitting room logs for five random days from the past month. If you don't have fitting room logs, that's the first problem to fix. Even a simple paper sheet tracking items in and items out gives you usable data.
For those five days, compare total items that entered fitting rooms against total items returned to the attendant, total items purchased from fitting room visits, and the gap between items in versus items accounted for. A 2–3% gap is normal—customers leave items in rooms, staff miscounts during busy periods. Anything above 5% signals active shrinkage.
Quick physical check (10 minutes):
-
Walk through each fitting room with a flashlight and check behind mirrors for removed tags
-
Check under benches for hidden merchandise
-
Check ceiling tiles if they're accessible
-
Check garbage bins for packaging or tags
Transaction pattern review (10 minutes):
Pull POS data for customers who used fitting rooms on high-shrinkage days. Look for multiple visits with no purchases, purchases of only low-value items after trying expensive pieces, and cash transactions immediately after fitting room use, which are harder to track on returns.
Staff interview questions (5 minutes):
-
Ask fitting room attendants which customers stood out as acting unusual
-
Ask what times get too busy to properly track items
-
Ask whether they've noticed specific items going missing repeatedly
The fixes depend on what you find, but three corrections work for most small stores.
First, implement a number tag system—customer gets a plastic tag showing how many items they're taking in, and you match it when they leave. Costs about $30 for a set of tags, eliminates most counting errors.
Second, schedule overlapping coverage during peak fitting room times. If Saturday 2–4pm is your busiest stretch, having two people for those two hours costs less than the shrinkage you're preventing.
Third, position high-theft items away from fitting room entrances based on your audit findings. Make it harder by placing these items where staff naturally observes them.
The POS reconciliation that catches internal shrinkage early
Internal shrinkage accounts for more losses than most owners want to admit. The average clothing store loses around $1,100 per employee annually to internal theft. Catching it doesn't require hidden cameras or playing detective—a simple monthly POS reconciliation spots the warning signs early.
This audit takes 30–40 minutes and focuses on transaction patterns, not accusations. You're looking for anomalies that suggest problems, then investigating further.
Start with three reports from your POS system: the void report for the month, the manual discount report, and no-sale drawer opens.
For voids, calculate your void rate: total voided transactions divided by total transactions. Clothing stores typically run 1–2%. Individual employees above 3% need a closer look. But what matters more than the rate is timing. Pull the timestamps on voids. Voids clustering near shift ends suggest someone manipulating transactions. Voids followed immediately by cash sales at similar amounts? That's a classic pattern—void a credit card sale, pocket the cash from the next customer.
The manual discount audit reveals different problems:
| Discount Pattern | What It Might Mean | Investigation Step |
|---|---|---|
| Same customer name repeatedly | Employee discounting for friends | Check if customer exists in your database |
| Round number discounts ($10, $20) | Arbitrary discounting without reason | Review security footage for these transactions |
| Discounts just before closing | Rushing to close, or self-discounting | Compare to scheduled shift times |
| High-value items frequently discounted | Targeting expensive merchandise | Check if items were actually damaged/returned |
No-sale drawer opens should only happen for specific reasons: making change, correcting bills, manager cash counts. More than 3–4 no-sales per shift is a problem. Either staff don't know when it's appropriate, or someone's checking cash levels before taking it.
Once you've flagged something worth investigating, work through it in three phases:
-
Data Collection Phase Record the employee name, specific dates and times of suspicious transactions, transaction amounts and types, and how frequently the pattern appears—daily, weekly, or sporadic.
-
Verification Phase Cross-reference with the schedule to confirm the employee was working, check security footage if available, review any customer complaints from those dates, and compare to previous months for that same employee.
-
Discussion Phase Present the data without accusations, ask for explanations of the patterns you found, document responses, and then implement specific corrections based on what you learn.
Corrections range from simple to systematic. For excessive voids, require manager approval on anything over $25. For discount abuse, create a written discount policy with specific percentages tied to specific situations. For no-sale problems, switch to a manager-key system for drawer opens.
Building your monthly audit routine
Running three audits monthly sounds like a lot, but once the routine is set, it becomes a 60-minute investment that saves thousands annually. Consistency and documentation are what make it work.
Schedule audits for the same week each month—most stores do the first Monday after month-end closing. You get fresh data while keeping it predictable for planning. Just vary the specific areas you spot-check so the pattern isn't easy for someone to game.
Here's a rotation that works well:
Month 1:
-
Receiving
Focus on highest-value shipments
-
Fitting rooms
Audit weekend days
-
POS
Examine new employee transactions
Month 2:
-
Receiving
Check most frequent vendors
-
Fitting rooms
Audit weekday patterns
-
POS
Review experienced employee patterns
Month 3:
-
Receiving
Verify oldest inventory in storage
-
Fitting rooms
Compare morning vs. evening
-
POS
Analyze promotional period transactions
After three months, you'll have baseline data showing your store's specific shrinkage patterns. Maybe Thursday shipments always have problems. Maybe fitting room theft spikes during sale events. Maybe one employee consistently shows unusual transaction patterns.
The documentation doesn't need to be complex. A simple spreadsheet tracking the audit date, area checked, issues found, actions taken, and follow-up results is enough. That historical record becomes genuinely useful for spotting trends and showing the value of your prevention efforts over time.
Keep a single spreadsheet with columns for audit date, area checked, issue found, action taken, and follow-up date to make trend spotting simple.
Consistency in scheduling and slight variation in what you check each month reduce the chance of someone gaming the routine.
When small stores actually benefit from automation
Once you've run these audits for several months, the patterns become clear—but tracking everything manually starts eating into actual selling time. This is where operational software built for small retail makes sense.
The stores that successfully reduce shrinkage long-term don't rely solely on manual audits. They use systems that flag anomalies automatically. Modern POS platforms can alert you when void rates spike or when specific SKUs show inventory discrepancies, and they compile the reports you need for monthly audits instead of making you dig through raw data yourself.
The automation handles the tedious parts: tracking which items entered fitting rooms, calculating void rates by employee, flagging receiving discrepancies in real time rather than waiting for end-of-month review. That frees your team to focus on investigation and correction rather than data gathering.
What matters most, though, is understanding your shrinkage patterns before you configure anything. Running these manual audits for three or four months gives you the insight to set up any system properly. You'll know which alerts actually matter for your store versus generic defaults that create noise without much value.
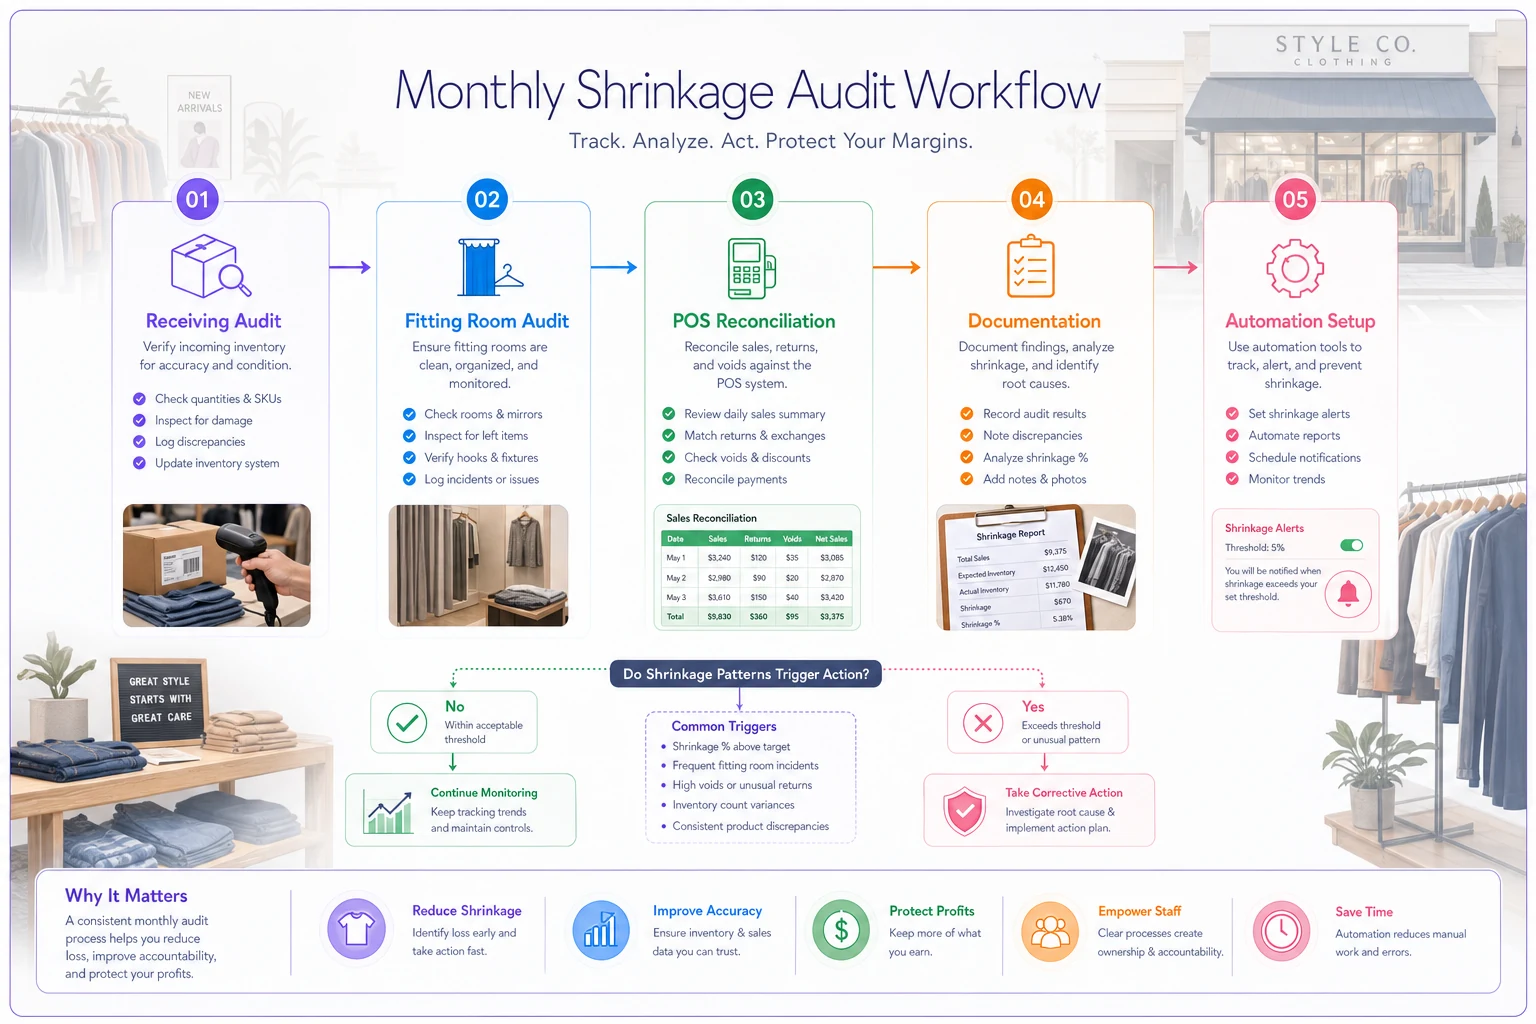
Visualizing the monthly audit workflow helps decide where to automate first.
Some stores integrate inventory tracking with their POS and receiving systems to create automatic flags when quantities don't match across touchpoints. Others use simple tablet-based fitting room management that tracks items in and out without paper logs. The specific tools matter less than having a consistent process that catches problems early.
Turn shrinkage audits into profit protection
That $8,000 year-end inventory surprise doesn't have to happen. Most shrinkage starts small—a miscounted shipment here, a fitting room theft there, a discount pattern that goes unnoticed for months. These monthly micro-audits catch small problems before they compound into real losses.
The stores that successfully control shrinkage share three things: they audit consistently, they document patterns, and they implement specific corrections based on what they actually find. They're not trying to prevent every possible theft. They identify their specific vulnerabilities and address those directly.
Start with just one audit next month. Pick whichever area concerns you most—receiving, fitting rooms, or POS reconciliation. Run through the investigation steps above. Document what you find. Then implement one specific correction based on your findings.
After three months of consistent audits, shrinkage shifts from an inevitable cost to a manageable operational problem. The hour you invest monthly saves significantly more than the time it takes. More importantly, you won't be caught off guard by losses that were quietly eating your profits while your focus was on growing sales.
The clothing stores that thrive long-term aren't just good at selling. They're good at keeping what they sell from disappearing before it generates revenue. These monthly audits make that possible without massive investment or complex systems—just focused attention on the areas where shrinkage actually happens.
Ready to elevate your apparel business?
Join 2,000+ retailers using Werzly to streamline operations, increase sales, and deepen customer loyalty.