



Walk into any clothing store during holiday returns season and you'll witness the barcode nightmare firsthand. A customer stands at the register with three items to return. The associate scans the first sweater—wrong price pops up. They manually search the SKU. Second item, a pair of jeans—barcode won't scan because someone slapped the sticker right on a seam. Third item has two barcodes, one from the vendor and one from the store, and nobody knows which one's current.
Twenty minutes later, the line's backed up, the customer's frustrated, and the associate just approved a return at the wrong price because they gave up trying to figure out which barcode was right.
This costs clothing retailers thousands in pricing disputes, return fraud, and lost customers every month. Not because the technology failed—because nobody established clear labeling standards from the start.
Why barcode chaos happens in clothing retail
The barcode problem in apparel retail comes from a fundamental mismatch between how vendors ship products and how stores actually need to sell them. Unlike grocery or electronics where products arrive in uniform packaging, clothing comes in with wildly inconsistent labeling.
A typical shipment might include:
-
Dresses with hang tags attached by plastic fasteners
-
Folded sweaters with adhesive labels on the poly bags
-
Jeans with sewn-in tags plus vendor stickers
-
Accessories in boxes with barcodes on multiple surfaces
Your receiving team opens these boxes and faces an immediate decision: leave vendor labels wherever they landed, or build a consistent system. Without clear standards, most stores default to chaos—slapping store barcodes wherever seems convenient in the moment.
The real killer comes during seasonal transitions. You receive fall inventory in July when you're still focused on summer clearance. Those items sit in back stock for weeks, get moved a few times, and by the time they hit the floor in September, half the barcodes are damaged, peeling, or gone entirely.
Then factor in the human element. Part-time associates working two shifts a week don't instinctively know that barcodes on curved surfaces won't scan properly. They don't realize placing a barcode on the inside hem means customers will struggle at self-checkout. Nobody told them heat-sensitive labels fade near the store's front windows.
The compound effect of barcode mistakes
Small labeling errors multiply fast. Take a typical scenario: you receive 40 units of the same style cardigan across five colors and four sizes. Your team uses different barcode placement for each colorway because different people processed each box. Some labels go on the price tag, others on the care label, a few inside the collar.
Take control of your clothing store operations.
Werzly helps you manage stock, process orders, and engage customers effortlessly.
- Unified inventory and order management
- Automated customer notifications
- Sales and stock analytics
No credit card required
Two weeks later, a customer wants to exchange a medium blue for a large blue. The associate can't find the barcode on the large because it's tucked inside the collar. They grab another large from the floor to check the SKU, but that one has the barcode on the sleeve. After three minutes of hunting, they manually enter the SKU—and accidentally transpose two digits.
Now your inventory shows one more medium than you actually have and one less large. That phantom inventory triggers an incorrect reorder. You end up with excess mediums that won't move and missed sales on the large that showed as in-stock online but wasn't on the floor.
Pricing confusion compounds it further. During a flash sale, you update prices in your POS but some items still have old barcode labels with embedded prices. An associate scans something, sees $39.99, but the customer saw a sale sign for $29.99. You honor the lower price to avoid a confrontation, eating the difference.
Return fraud gets easier too. Without consistent barcode placement, associates struggle to verify items at the return counter. Someone brings in a sweater they claim they bought last week for $89. The barcode's partially torn, barely scannable. Rather than hold up the line, the associate just processes the return.
Creating SKU-specific labeling rules that actually work
Structured items (blazers, coats, jeans, structured bags): Place barcodes on internal brand labels or pick a consistent spot on the inner left side. These items hold their shape, so internal placement stays reliable. The barcode stays protected from handling while remaining easy to access for scanning.
Knits and delicates (sweaters, t-shirts, jersey dresses): Use removable adhesive labels on the exterior price tag only. Never place adhesive directly on knit fabric—it leaves residue and can pull the material. If an item doesn't have a firm price tag, your team needs to attach a hanging barcode tag first.
Accessories (scarves, belts, small leather goods): Attach loop tags with barcodes through existing hardware or around the item. Adhesive labels on leather or delicate materials cause permanent damage. For boxed accessories, place the barcode on the same corner of every box—lower right front is a standard that works fine.
Intimate apparel and swimwear: Use tear-away perforated tags attached to the existing brand label. Never use adhesive labels that could transfer to skin or other garments.
Multi-piece sets: This is where most stores fall apart. For suits, coordinates, or pajama sets, each piece needs its own barcode, but you also need a master SKU for the set. Create a primary barcode on a hanging tag that stays with the set, plus individual barcodes on each piece in case they get separated.
Placement matters as much as label type. Barcodes should be:
-
2–3 inches from any edge or seam
-
On flat, firm surfaces whenever possible
-
Protected from rubbing against other items
-
Accessible without fully removing the item from display
Placement matters as much as label type. Barcodes should be:
Physical placement standards for different fixture types
Your fixture layout has a bigger impact on scan efficiency than most managers realize. Different display methods need different labeling strategies.
Hanging racks need barcodes positioned for quick scanning without removal. Place them on the left interior side, about 6 inches from the bottom hem. Associates can scan while items stay on hangers, which speeds up both sales and inventory counts.
Folded displays create their own challenges. Barcodes must be visible without unfolding the whole item. Place them on the exterior of the fold—typically the upper back portion that stays visible when stacked. For premium displays where visible labels aren't ideal, clear removable dots on the corner work without damaging fabric.
Wall systems and waterfalls need barcodes accessible from the front. Loop tags work best here, hanging slightly below the garment so associates can scan without pulling items forward.
Table and platform displays require labels that survive constant customer handling. Reinforce standard labels with clear tape overlays, or invest in laminated hang tags that hold up through heavy browsing.
The checkout area needs its own consideration. Items frequently purchased together need barcodes positioned for rapid scanning. Consistent upper-right placement on packaging or tags builds cashier muscle memory for where to look.
Building a daily scan audit routine
A daily scan audit catches labeling problems before they compound. This isn't about checking every item—it's targeted spot-checks that surface systematic issues before they cause real damage.
Morning scan check (about 2 minutes): Before opening, grab five random items from different categories. Try scanning each from typical positions—hanging, folded, and at the angle a customer would hold them. Any failures point to placement problems in that category.
Midday fixture check (90 seconds): Pick one fixture or table. Scan the first item on each row or arm. This reveals whether morning restocking kept up with standards or whether rushed replenishment got sloppy.
End-of-day return verification (90 seconds): Scan three items from the return rack before reprocessing. This catches damaged or missing labels before items go back to the floor, and reveals if certain brands or styles consistently cause labeling problems.
Track patterns, not just individual failures. If knits consistently fail the morning scan, you might need stronger adhesive or different label material. If returns always come back with damaged barcodes, customers might be removing them—which tells you placement is too prominent.
The audit log should be dead simple:
| Field | What to Record |
|---|---|
| Date/Time | Shift and time of check |
| Items Scanned | Category, not specific SKUs |
| Failures | Won't scan, wrong price, duplicate barcodes |
| Pattern Noticed | Damage type, location, category trend |
| Action Needed | Relabel, retrain, adjust placement |
Keep this data somewhere you can actually review it. After two weeks, you'll see if Tuesday shipments always have problems, or if one associate's sections consistently fail audits.
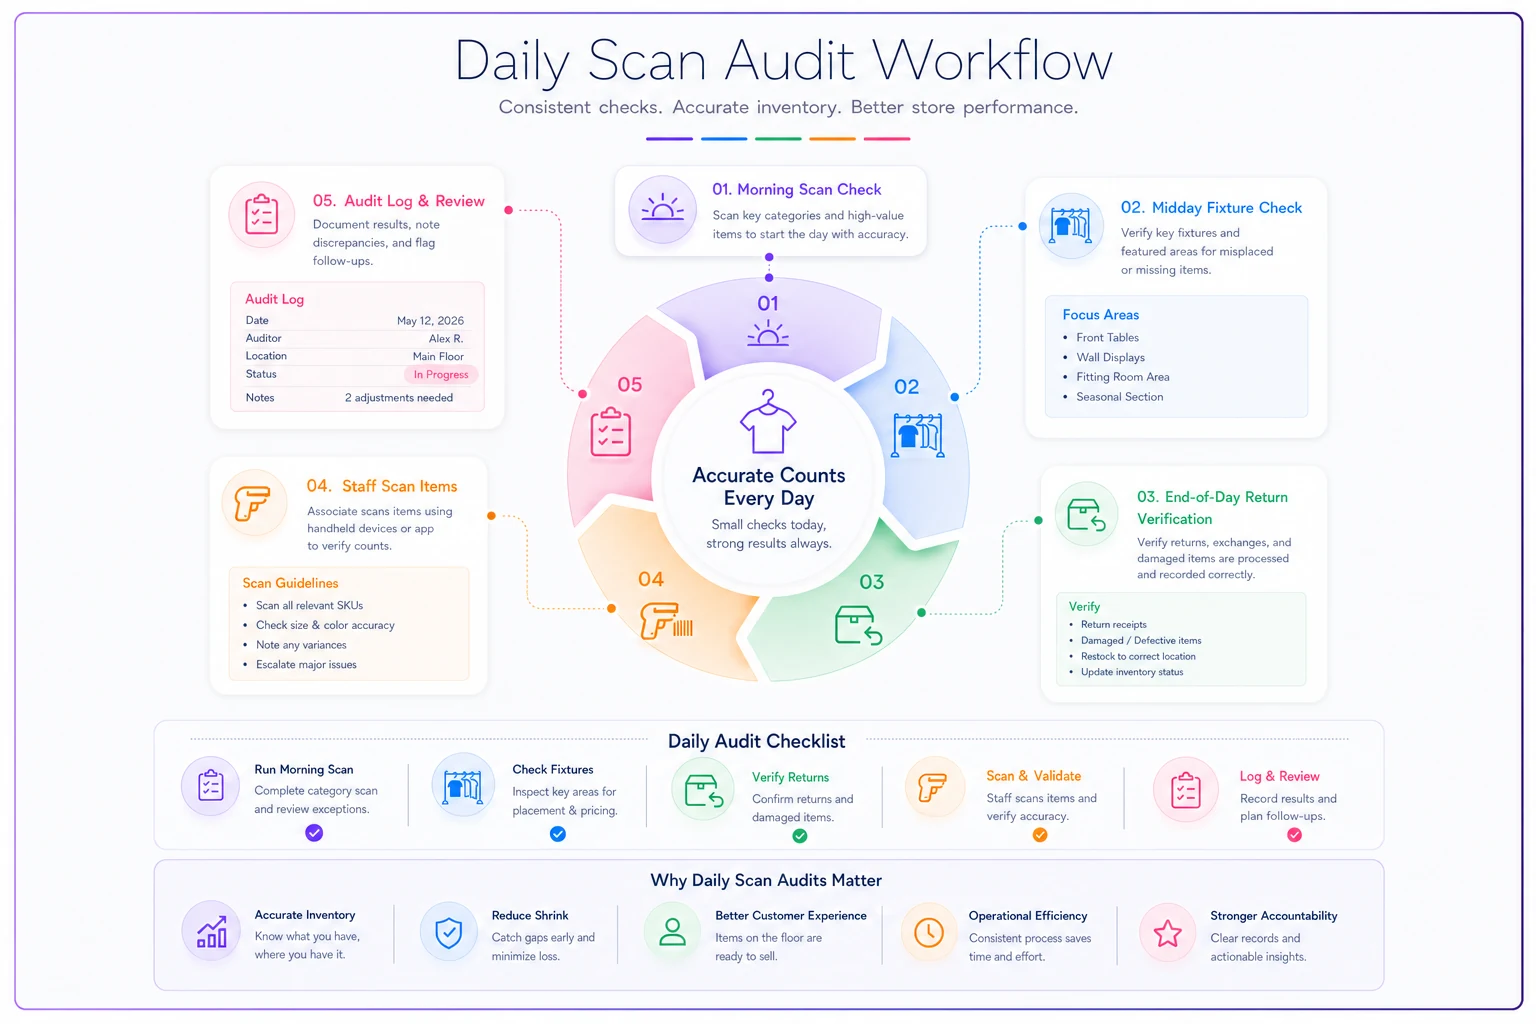
Use a simple checklist and consistent timing to make audits repeatable and fast.
The receiving inspection that prevents downstream problems
Most barcode disasters start in receiving. When boxes arrive and the team's under pressure to get product on the floor, labeling standards fall apart. The fix is a simple receiving check that takes about 30 seconds per box but prevents hours of problems downstream.
The 30-second box check: Open the box and grab three items—top, middle, bottom. Check whether vendor barcodes exist and where they're placed. Make the labeling decision for the entire box based on these samples, not item by item.
-
If vendor barcodes work and placement is consistent
green light, move to staging.
-
If vendor barcodes exist but placement varies
flag for relabeling with store barcodes in consistent positions.
-
If no vendor barcodes or they're damaged
relabel immediately before the box moves anywhere.
A few rules worth committing to:
Never mix labeling systems within the same SKU. If even one unit needs a store barcode, relabel the entire SKU. It seems like extra work upfront but saves a lot of time during sales and returns.
When vendor barcodes embed prices, always cover or replace them. Customers will find that old $129.99 price on a barcode when you're selling the item for $79.99 and ask for the lower price—and honestly, it's hard to argue against them.
For split shipments of the same SKU across multiple boxes, check all boxes before deciding on labeling. Otherwise you'll have half your inventory with vendor barcodes and half with store labels.
Document labeling decisions by vendor. After a few shipments, you'll know Brand X always needs relabeling while Brand Y's barcodes work fine. Post a problem vendor list at the receiving station—brands that require automatic relabeling regardless of how clean their barcodes look. Usually these are brands that frequently change their barcode format or position.
Technology setup that supports consistent scanning
Your POS system and scanners probably have settings you've never touched that could eliminate a big chunk of scanning problems. Most stores use default configurations that assume perfect conditions—flat barcodes on rectangular boxes in a well-lit warehouse. Retail clothing is none of those things.
Scanner adjustments worth making:
Increase the scan angle tolerance to catch barcodes on curved surfaces. Most handheld scanners can be adjusted to read at up to 45-degree angles but ship at around 20-degree defaults.
Set the scan distance for your actual checkout setup. If your counter is 18 inches wide but your scanner's optimized for 12 inches, associates constantly struggle with larger items.
Enable "aggressive mode" for damaged barcode reading. Scanning gets slightly slower but first-scan success on worn labels improves a lot.
POS configuration fixes:
Set up SKU pattern recognition so the system flags obvious entry errors. If all your internal SKUs start with specific digits, the system should alert when someone manually enters something that doesn't match.
Create automatic price verification for returns. When an item's returned at a price different from current inventory, require manager override. This catches both honest mistakes and fraud attempts.
Enable duplicate barcode warnings. When the same barcode appears on multiple SKUs—which happens with vendor relabeling—the system should force SKU selection rather than assuming which product it is.
Database hygiene:
Purge old barcodes quarterly. Vendors sometimes reuse barcodes after 6–12 months. If you don't clean out old SKUs, a scanned winter coat can ring up as last year's summer dress.
Maintain a translation table for vendor barcodes. Rather than relabeling everything, map vendor barcodes to your SKUs in the POS. Works well when vendors are consistent but use different numbering than your system.
Never delete SKU history, just deactivate it. When disputes come up, you need that history to verify what something actually sold for three months ago.
Training shortcuts that stick with part-time staff
Clothing retail's turnover rate means complex training doesn't survive contact with reality. You need standards that make sense immediately and stick after one shift.
The "three finger rule" eliminates placement guesswork. Barcodes go three fingers from any edge, seam, or curve. This physical reference works better than explaining inches to someone on their second shift.
Visual guides beat written procedures every time. Post photos at the labeling station showing correct placement for each product category. Red X's over common mistakes make wrong placement obvious at a glance.
The "scan before you place" habit prevents most problems. Before applying any new barcode, try scanning it. If it doesn't work perfectly flat in your hand, it definitely won't work on the product.
Assign labeling buddies rather than putting it on one person. Two people checking each other's work catches mistakes immediately. Consistency also improves when people work in pairs versus alone.
Make the right supplies obvious. If knits need loop tags but your labeling station only stocks adhesive labels, associates will use what's available. Stock each station with only the correct label types for that product category.
Build muscle memory through practice. Have new associates label 20 items correctly before they touch actual inventory. Use damaged or unsellable items so mistakes don't matter.
The weekly refresher takes two minutes at shift start—one common mistake from the past week and the fix. Keeping it short and specific means associates actually pay attention instead of tuning out another procedures speech.
Return processing with solid verification
Returns are where bad labeling standards really bite you. Without consistent scanning ability, associates make judgment calls that hurt your margin.
A solid return workflow starts with double-verification. Scan the barcode first. If it works, check the price against the receipt. If scanning fails, look up the SKU manually, then immediately relabel the item with a working barcode before processing the return.
-
Check for duplicate barcodes in the system
-
Verify the item matches the receipt description exactly
-
Confirm the return price matches recent sales history
-
Apply a fresh barcode before accepting the return
For online returns to store, barcode verification gets especially important. Online inventory often uses different SKUs than retail. Establish clear mapping between online and retail barcodes. If an item ordered online doesn't scan in store, check the online SKU translation table before assuming it's not your product.
High-theft items need extra attention. Designer jeans, premium jackets, and branded accessories should trigger automatic verification steps when returned. Tampered or replaced barcodes on these items is a red flag worth pausing for.
Track return patterns by associate. If one team member consistently processes returns with "damaged barcodes" requiring manual overrides, that's worth a closer look. Some associates avoid confrontation by accepting questionable returns rather than properly verifying them.
Seasonal transitions without losing labeling discipline
Clothing retail's constant seasonal churn stresses any labeling system. When you're simultaneously clearing summer, receiving fall, and planning holiday, standards slip fast.
Pre-season prep prevents most of the chaos. Two weeks before new season inventory arrives:
-
Order correct label types for incoming categories
-
Clear backstock of old labels that might get used by mistake
-
Refresh fixture-specific placement guides
-
Test scanners with sample labels at different angles
Transition zones need specific rules. When old and new season merchandise mix on the same fixtures, keep labeling systems strictly separate. Old season clearance labels overlapping with new season full-price systems creates a mess for POS accuracy.
Every time merchandise moves—receiving to back stock, back stock to floor, floor to clearance—verify barcodes remain scannable. Physical movement damages labels, especially on delicate fabrics.
Seasonal labeling calendars help more than most people expect. Map out when each product category arrives and what labeling it needs. Planning prevents the "figure it out as we go" approach that creates inconsistency across your floor.
The markdown progression needs barcode planning too. As items move from full price to promotion to clearance to final sale, each markdown phase needs clear labeling. Some stores use colored dots over existing barcodes, others print new labels. Either works if applied consistently.
Holiday rush prep starts in October, not November. Train seasonal associates on labeling standards before Black Friday hits. Create simplified guides for temporary staff who won't be around long enough to learn the full system.
Making labeling standards scale as your operation grows
As your store adds channels like buy-online-pickup-in-store, labeling standards become even more important. When customers place orders for in-store pickup, associates need to locate and scan items quickly. Inconsistent barcode placement slows fulfillment and causes order errors that damage the customer experience.
Operational software platforms built for retail now include barcode management features that catch labeling inconsistencies automatically. These systems track scan success rates by product category, flag items with repeated scan failures, and can predict which incoming shipments will need relabeling based on vendor history. That kind of visibility is hard to replicate with spreadsheets and memory.
The platform can maintain your labeling standards database and automatically surface placement guidance when new product categories arrive. Instead of associates guessing where to place barcodes on an unfamiliar accessory type, the system references similar products you've already handled and applies those rules.
AI-assisted pattern detection helps surface issues that are easy to miss manually. When scan failures spike on Tuesday afternoons, the system can correlate that with your part-time team schedule and flag it for follow-up. When returns of a specific brand consistently show barcode issues, it triggers additional inspection during receiving—before the problem compounds across an entire shipment.
Some platforms now offer predictive barcode printing—generating labels for incoming shipments before they arrive, based on purchase order data. Your receiving team matches and applies pre-printed labels instead of making decisions under pressure. That alone improves consistency and speeds up processing considerably.
The real operational gain comes from connecting barcode standards to your other store systems. When your POS, inventory management, and fulfillment tools all reference the same labeling standards, mistakes get caught immediately instead of quietly compounding over weeks.
Barcode labeling feels like a minor detail until you start tracking what it actually costs. Those five seconds lost on a failed scan multiply across hundreds of daily transactions. The return processed at the wrong price eats margin you can't recover. Inventory confusion from inconsistent labeling leads to stockouts on your best sellers while dead inventory piles up in the back room.
Pick one product category and get its labeling standard right. Nail the placement, train every associate who touches those items, and run daily scan audits for a week. Once that category runs cleanly, move to the next. Within a month you'll have systematic standards that prevent most of your POS errors and return disputes.
The investment is mostly just attention and consistency. The payoff shows up in faster checkouts, accurate inventory counts, fewer pricing disputes, and associates who actually trust the system instead of constantly working around it. In an industry where margins are tight and customer patience is thin, getting the basics right makes everything else work the way it's supposed to.
Ready to elevate your apparel business?
Join 2,000+ retailers using Werzly to streamline operations, increase sales, and deepen customer loyalty.